This procedure describes how to configure barcode scanners in SNAPI (Symbol Native API) mode. This allows scanners to present themselves to your POS computer in a more robust manner, as opposed to scanners that work in “Keyboard Emulation” mode. Keyboard Emulation mode allows for basic scanning functions to be carried out in the POS, but does not allow for extra features, such as transmitting image data, decoding driver’s licenses, and performing price checks using the Price Check feature (found in several areas of the Grindless POS). The following procedure is not required when using Grindless, but it is recommended for any 2D barcode scanners that supports SNAPI mode, including many types of scanners built by these manufacturers: Symbol, Motorola, & Zebra.
The following steps describe how to enable SNAPI mode using special configuration barcodes. It is also possible to enable SNAPI mode using software provided by the device’s manufacturer. Zebra’s “123scan” utility, for example, can enable SNAPI mode on some 2D barcode scanners.
Procedure
Perform these steps in order:
- Connect your barcode scanner to a USB port on your POS computer.
- Confirm that the scanner is currently in Keyboard Emulation mode by opening the program Notepad from your Windows start menu, and attempting to scan any regular barcode. If you see the barcode appear in Notepad after scanning, then your scanner is in Keyboard Emulation mode, which is good. If you do not see a barcode appear, then your device may already be in SNAPI mode, or is malfunctioning.
- Install drivers for your scanner onto your POS computer.
- You can usually find drivers from the manufacturer’s website. For Zebra/Symbol/Motorola scanners, you will likely need the “Core Scanner” driver package. Here is a direct link to the driver download page: click here. Look for “Zebra_CoreScanner_Driver_(64bit).zip” (a version number will be present in the filename).
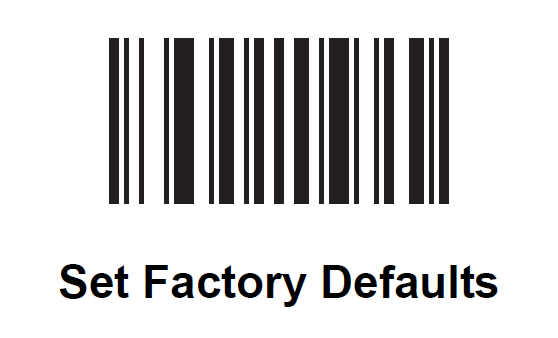
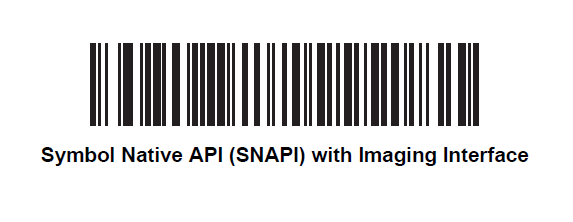
- With your barcode scanner in hand, scan the barcodes below (in order).
- You should be able to scan your computer’s screen here with your scanner. Hold the scanner about 18-inches from the computer screen and scan the computer screen itself.
- After scanning each barcode, you should hear a beeping sound and the scanner may restart itself.
- You may need to reboot your POS computer before you can use SNAPI features.
Hint: If having trouble scanning these barcodes from your computer screen, you may need to print out this sheet on paper to scan it.
Factory Defaults
Reset barcode scanner back to defaults.

Blink
Enables “hands free” mode where the scanner will scan barcodes automatically when it detects something in front of it, avoiding the need to pull the trigger to scan.

PDF Prioritization
Attempts to read 2D barcode before a 1D barcode (for drivers license scanning).

Cell Phone Screen Reading (“Both Modes”)
Improves scanning of digital screens, including cell phone screens.

Enable SNAPI Mode
The Grindless POS application will read data directly from the scanner (this will disable the scanner from working in a web browser, but allows it to capture pictures and gives the POS application better control over how to use the scanned information).

Note: if you had previously used your scanner with our Point of Sale application in RAW or OPOS mode, then you will need to make sure the application settings are updated to no longer use either of these modes. If you don’t know what this means and your scanner seems to work fine, then you can ignore this message. You can access the application settings panel by clicking the Grindless icon in the far upper left of the POS application, then clicking Settings. Then, ensure the field labelled “Barcode LDN” is blank.
