![]()
INTRODUCTION
This document covers the setup, installation, and configuration of GraphicsTV devices.
Download a PDF copy of these instructions here: Download PDF
ABOUT
These devices display graphics from the Grindless cloud on a screen using an HDMI connection. You can configure which graphics are displayed on your device through the Grindless POS. The device can be powered by the television’s USB port and will normally turn off and on with the television. However, depending on your TV you may need to provide a separate power source (any USB charger and micro-B USB cable should suffice).
It is recommended to always have a WiFi access point available to obtain new graphics from the server. The process of downloading and displaying new graphics will take place automatically when the GraphicsTV device is able to connect to your WiFi access point. Media will be displayed as a single static image OR as a slideshow if more than one image is sent from the server. The device is designed to disconnect from WiFi to avoid unnecessary wireless signal noise in your location. It will connect to WiFi, check for new media, download the new media (if needed), display the media, and finally disconnect from your WiFi. To force the device to check for new images, restart the TV and the device will check for new images as it starts up.
CONTENTS
A purchase of one Graphics TV device from Grindless (or authorized vendors) includes the following:
| GraphicsTV device (case may vary)  |
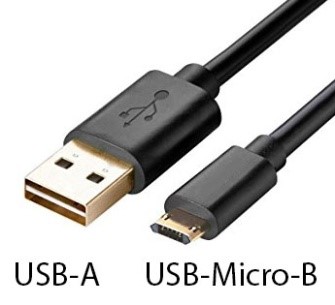
USB-A to Micro-B power cable (1’ length)
|
Mini-HDMI to HDMI cable (1’ length) 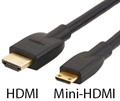 |
INSTALLATION
- IMPORTANT: Set up one device at a time. Complete the configuration of first device before connecting the next.
- Connect Mini HDMI cable and USB cable to device.
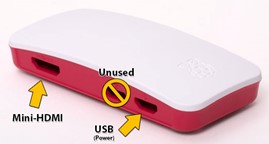
- Connect other ends of HDMI and USB cable to Television. If cables do not reach, acquire a longer micro-B USB cable.
- Use backing tape to secure it to television.
CONFIGURATION
- Power on the TV.
- Select the TV input that the device is connected to. For example, HDMI #1.
- For a first-time setup, the device will attempt to connect to a WiFi network for about 2 minutes. During this time, you should see mostly white on blue text on the screen.
- Eventually, you should see a blue screen with large white writing. If you do not see a white border on this screen, look to TV settings to turn off “Overscan” or set to “PC Mode”. On others, it may be a mode under “Aspect Ratio” or “Stretch Mode”, in which case using “Full 100%” or “Full” are usually correct. If you are unable to adjust to see the white lines, you will need to change the “Overscan” checkbox on config below.
- Once startup is complete, connect using your phone (or another WiFi enable device, like a laptop) to the WiFi hotspot shown on screen. This name starts with “ZeroSpot“. Some phones will show a message stating “internet not available”, this is normal since you’re connecting to the GraphicsTV device, which itself does not provide an internet connection to your phone. Select the option to stay connected to the “ZeroSpot” WiFi hotspot.
- After connecting, go to a web browser on the same device and enter this into your address bar and connect:
http://10.0.0.1 - You should see something like this:
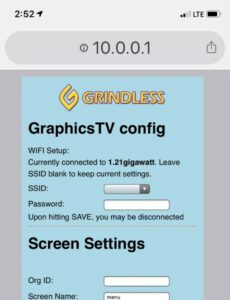
- Select your WiFi network from the dropdown menu next to SSID
- Type the WiFi password into the password field. Leave the password field blank if there is no password.
- Enter your organization ID where it reads “Org ID”. If you do not know your store’s organization ID, it is shown on Organization Profile in the POS.
- Enter a name for the screen. Common names are “leftmenu”, “rightmenu” or “promo”. This name must match exactly the name used when configuring in the POS (Setting Graphics TV).
- If you could not adjust the TV to see the white border, uncheck the box labeled “Overscan”. This will vary based on the type of TV you use.
- If you TV does not support 1080p resolution, you may not see anything on the TV screen. If this is the case, uncheck “Force 1080p”.
- Leave other values at default for initial setup.
- Click “Save & Reboot”.
CHANGING SETTINGS
After the initial setup process, you may log back into the GraphicsTV device change settings. During the bootup process, an IP address is displayed briefly on screen. Type this IP address into a web browser on a device (PC, phone, etc) that is connected to the same local network. The connection is only on for about 1 hour after restarting the device, so you may need to turn off and on the TV. If you have trouble connecting via a hard-wired device (a computer plugged into your network via an internet/Ethernet cable). The hotspot is also available for a short period after restarting.
OTHER SETTINGS
Other settings are available to change the behavior of the GraphicsTV. These may change over time as the software on the device is automatically updated.
- Connection Timeout – This is the amount of time the device will maintain a Wifi connection and/or hotspot after turning on. You can lower this value to increase security or increase it to keep the devices on longer. Setting to 0 will cause device to be always connected.
- Check Updates – This is the time, in MINUTES, the device waits before checking for new graphics.
- Slide Time – The amount of time, in MILLISECONDS, to display each slide before transitioning.
- Slide Host – This must be set to the correct host. Grindless POS customers choose “Grindless” and PLAYlive Stores choose “PLAYlive”.
TROUBLESHOOTING
- Nothing on screen.
- Make sure HDMI cable is fully inserted into the device. It may be a tighter fit than expected.
- Turn on/off power. HDMI should be connected prior to turning on.
- If necessary, remove lid of device and check if green LED is on. If not, the storage on device may be corrupted or is not getting power.
- Make sure your screen supports 1080p. If not, try to access config and uncheck “Force 1080p”
- Screen reads “No Images Available” (or similar) on blue screen.
- This usually indicates the “screen name” did not match any images on the server. Double check screen name in configuration then contact support for assistance.
- Nothing but small text shows on screen
- Wait up to 5 minutes to complete start up process.
- Try restarting device by turning TV off and back on.
- If nothing else works, contact support and include photo of screen if possible.
- Nothing happens after connecting to WiFi during setup
- Try moving the device closer to your wireless access point during the setup process. If the problem is resolved but returns when you move the device further away, then your access point may be located too far away from the device. In this case you should consider getting a wireless repeater, or consider connecting the device via an ethernet cable (using a USB to ethernet adapter). Contact Grindless Support for more info.