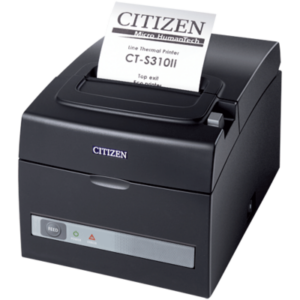
 This topic describes setup and troubleshooting for the Citizen CT-S310ii thermal receipt printer.
Setup
Procedure:
- Connect your printer to power and power it on, then connect a USB cable between it and your point of sale computer.
- Hint: Receipt printers in particular are sensitive to USB hubs/splitters. It’s strongly recommended to plug the printer directly into the computer and not through a hub. If you do use a hub, use one that has its own power supply and wall adapter.
- Download drivers for the printer from the manufacturer’s website (click here), including:
- Windows Driver
- OPOS Driver
- Open your downloads folder and extract the two files you just downloaded.
- Open the destination folders for each of the two driver files you just extracted in step 3.
- Run the setup program for the Windows Driver. Click next and agree as needed through each step. You don’t need to change any options during installation, just click next until it’s done installing.
- Run the setup program for the OPOS Driver. Same as above, click next until the driver is done installing.
- Open your list of printers by opening your Windows start menu and clicking Settings. Navigate to Printers (which may be found under the subcategory “Devices” depending on your version of Windows).
- Find your newly-added Citizen Receipt Printer and click on it, then click Manage.
- Click Printer Properties.
- Click “Ports” from the top, and ensure “Enable bidirectional support” is UNCHECKED. Click OK.
- When you change this setting, you’ll need to reboot your PC for the new setting to take effect.
- Open your Windows Start menu and find the Citizen folder in the list of available programs.
- On Windows 11, you may need to click “All Apps” before you can see the full list of programs.
- Hint: do not go into the Installed Apps in the Settings area. This is not what we’re looking for.
- From the Citizen folder, open “OPOS Configuration Utility”.
- From the OPOS Configuration Utility, right click on Printers and click Add New. Select your model (CT-S310ii) and click Next.
- Ensure “Map Image with BMP Resolution” is CHECKED.
- Give your printer a “Logical Device Name” (LDN).
- By default, the Grindless POS looks for printers that are named “POSPrinter” (case sensitive). We suggest using this name so you don’t need to change the LDN that the the POS looks for later.
- (optional) After adding your printer, move on to adding a cash drawer as an OPOS device.
- Use the LDN “CashDrawer#1”. Don’t change the number to reflect your current register number. This number refers to how many cash drawers you have plugged in to this computer, so it is different than the Register Number in Grindless. Just set it to CashDrawer#1 on each of your POS stations.
- Right click on your printer and click Device Test to ensure it is functioning properly. Also test your cash drawer, if applicable.
- From the Grindless POS app, login and go to Settings > Device Settings and ensure the “Print Method” option is set to “Modern Client”. Click Save if needed.
- Print a test receipt. The easiest way is to go to Reports > Completed Orders and printing a receipt for any order. Inspect it visually to ensure it is printing correctly.
Troubleshooting
- Receipt printer stops working after initial setup
- Check the port number for the OPOS device. Open the OPOS Configuration Utility and ensure that the port number it is set to use is the correct one. Go to your list of printers in Windows, click on the printer, then Printer Properties and look at the Ports tab. There will be a checkbox checked next to the port the printer was assigned (USB001, USB002, etc). Ensure your printer in the OPOS Config app is set to use this same port number.
- Ensure Print Method is set to Modern Client in Grindless POS’ Device Settings screen.
- Ensure bidirectional support is still disabled in Printer Settings > Ports.
- Ensure printer has paper, is powered on, and connected to PC (and the PC can see your printer / is listed in list of printers and shows as “Idle” and not “Offline”).
- Information printed at top of receipt is wrong or missing
- From Grindless POS, go to Settings > Organization Profile and ensure all fields are filled out with your store’s info (name, phone number, etc).
- From Grindless POS, go to Settings > Receipt Designer and ensure that you have a template in place for the receipt Header. Customize the header as needed and save. You may also do the same with the footer and other receipt template parts.
- Layout of printed receipts looks strange
- Check print character width in Grindless Device Settings. If it is set to 48, try 42 instead (or vise versa).
Frequently Asked Questions
- My printer still does not work and I need help
- Use the Report Problem button in the POS app to send a report to our support team and we will assist you further.