This page contains a list of hardware that is known to be compatible with the Grindless POS system. There are more devices that are compatible with our POS system than what is listed below, but these specific devices have been tested to be compatible.
Links to buy products are provided where possible. You are also welcome to shop around for the best prices on any hardware listed (double-check the model numbers when doing so). It is strongly recommended to coordinate with a Grindless On-boarding Specialist on our team before making purchases to ensure that your purchases are accurate and essential. If you already have hardware present on-site and you would like us to look into whether or not it is compatible with our POS, please let your representative know during the sign-up process.
Grindless does not manufacture any hardware listed on this page. We will attempt to setup your hardware devices for you, and can help troubleshoot basic problems afterwards, but you are expected to be familiar with your hardware and perform basic troubleshooting steps prior to contacting our team for help. When in doubt, check cables and turn it off and on!
POS Software Setup
We have a guide that walks you through the process of how to install and configure the Grindless POS app on your computer(s). For first time user, we highly recommend scheduling a meeting with our support team so that we can walk you through the process the first time. After that, you can choose to continue having us setup additional computers or you can conduct the setup process on your own.
- Link: POS Software Setup Guide
POS Hardware Setup
We have several guides available with instructions on how to setup various types of hardware to work with the Grindless POS.
Browse the hardware setup guides here: grindless.com/guides
About USB Hubs
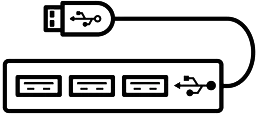 If your computer doesn’t have enough USB ports on the device itself, you can add additional ports by using a USB hub.
USB hubs are very frequently the source of hardware problems. Avoid using USB hubs if possible. If you absolutely need to use a hub, we recommend connecting hardware that is critical for POS tasks directly to your PC, and connecting any ancillary hardware to the hub. Receipt printers in particular are sensitive to hubs and should always be connected di
When using a hub, we strongly recommend using one that has an external power supply. The USB ports on your PC can only supply so much power, and if your hub is sharing this power between the devices plugged into it, it can exceed the power supplied by your PC and cause issues. Always try to use a hub that has an external power supply.
Recommended Hardware
Desktop Computers
In order to use hardware like cash drawers/printers/scanners, the Grindless POS must be used from a Windows-based computer. This computer may be an All-In-One device, a Windows tablet, or even a laptop to save on counter space. If you don’t intend on needing to use scanners or printers, then you may access the POS from any modern mobile device (see below).
Grindless does not sell or supply computers directly, so you may use existing computers at your store(s) or purchase computers from a local or online supplier.
The Grindless POS application is not very demanding on computers. In general, if the computer can perform common “office” related tasks like checking emails and browsing the web, then it will likely be suitable to use with the Grindless POS. That said, you get what you pay for! If you buy $200 PC and use it as your main checkout station, don’t be surprised if your staff complain that it’s slow and struggles to keep up with basic tasks.
- Storage: 250MB for application, >10GB spare disk space
- Using a solid-state disk (SSD) is highly recommended. Mechanical hard drives will have a tough time keeping up with the demands of a modern operating system.
- CPU: Intel G4600 3.6ghz 2 core, 4 threads or higher. Or Intel i3 equivalent or higher.
- Memory: 4GB minimum, 8GB recommended.
- Operating System: Windows 10 (64-bit) or newer. Windows 7 is not supported.
- Display: HD resolution recommended for best experience (1080p or higher). Lower resolutions will work, but it won’t be as pleasant of an experience.
- Ports: We recommend using a PC that allows important devices (i.e. a receipt printer) to be connected directly to the PC via its USB ports. Using USB hubs/splitters can lead to unexpected complications, especially with laptop/tablet computers. If you are using a USB hub, we strongly recommend that it is powered with an external AC wall power adapter. Do not use a USB hub that gets its power from the computer’s USB ports only.
- Internet: 10mbps or higher
- The Grindless POS is a web-based application and makes frequent requests over the internet to our server. If your internet connection is slow or unstable, your experience using the application may be degraded.
- If using WiFi, ensure that you have a reasonably fast and stable wireless connection. If your PC is located a far distance from your WiFi access point, consider running an ethernet cable to your PC instead.
Mobile Devices
The Grindless POS can be accessed from virtually any modern web browser, such as Google Chrome. In fact, our Windows app is powered by Microsoft Edge (which is based on Google Chrome).
Our POS is a web-based application, meaning you can access it from virtually any device that can browse modern websites. This includes desktops, laptops, tablets, and most modern smartphones. We recommend using a Windows PC for your main checkout stations, and then for back-office stations you may use other devices like laptops and even tablets depending on your needs.
If you’re wanting to use a tablet for inventory, you’re welcome to access the POS from Chrome and use a bluetooth scanner, for example. And if you also have a label printer available on your network, you can even print price tags wirelessly too! Just keep in mind that our team can’t possibly know how to setup every device ever made, so if you’re using an old/obscure Android-based tablet, for example, you may need to read the manual and do some Googling first to setup your printer or scanner before we can provide assistance.
Hint: we recommend Star TSP143 printers for wireless label printing.
Receipt Printer
Generally speaking, if a receipt printer supports the software feature “OPOS”, then our Point of Sale can use it.
Recommended Printers (in order of recommendation):
- Star TSP100/143 Thermal Printer – Driver Download
- Easy to setup. Very reliable. Driver software is modern and intuitive. Some models have built-in LAN or Bluetooth operation if desired. We recommend using the USB model of this printer for the best experience. Make sure you pick the correct model when purchasing. If you buy the LAN version and your store’s network router is located far away, that would create a problem.
- OPOS is bundled into the main driver package. OPOS can be configured from the main config app after installation.
- Citizen CT-S310II Thermal Printer– Driver Download
- Reliable. Must be used without “bi-directional support” in Windows > Settings > Printer Settings > Ports. Occasionally, Windows may decide to re-initialize printer and this option will become re-enabled, making the printer not work with the POS software until unchecked again.
- OPOS is installed as a separate software package. It can be downloaded from the driver page linked above.
- Epson TM-T88V – Driver Download
- Good printer, but install process is not very intuitive. Driver software gets confused if connected cash drawer does not send back “drawer status” signaling.
- OPOS is installed as a separate software package. It can be downloaded from the driver page linked above.
Optional inexpensive receipt paper: Gorilla Supply Thermal Receipt Paper Rolls 3 1/8 x 230 10 Rolls
In all receipt printers above, “OPOS” must be configured. This is an extra layer that sits between the Windows driver and our POS software. OPOS is a standard used by many Point of Sale systems, including ours.
Our POS application looks for OPOS devices when it first loads. You can check to see what OPOS devices it looks for by opening the Kiosk Settings panel by clicking on the Grindless icon in the application’s title bar (far top left) and clicking Settings from the menu. The Kiosk Settings panel will show what Receipt Printer, Cash Drawer, and Credit Card Terminal (if applicable) it is configured to look for.
Cash Drawer
As with Receipt Printers, our Kiosk Application is compatible with cash drawers that support “OPOS”.
Most cash drawers are connected to a Receipt Printer with a special cable, and the printer controls the drawer. Receipt Printers will have options for setting up Cash Drawers as part of their OPOS software configuration area (varies by manufacturer). Keep in mind that for the cash drawer to work, the receipt printer must also work! Some receipt printers will throw an error if they are out of paper or the cover is open, which means you may not be able to open the cash drawer in these kinds of error states.
Product: AGP VB320-BL1616 Standard-Duty Cash Drawer, Vasario Series
Cash Drawer Cable: APG CD-101A Printer Cable
Caution: many people see an RJ45 port on their cash drawer and think it is an ethernet port, like those found on computers. This port uses the same connector, but it is NOT an ethernet port. The signals are entirely different. Do not connect it to your router/modem/network equipment.
Barcode Scanner
Most generic barcode scanners will work with our Point of Sale. These scanners present themselves to the computer as if they were a keyboard “typing” the numbers on the barcode they read. While convenient to setup, this also means you may sometimes need to click into a text box before you start scanning, which can slow down your process during busy times.
For best results, we recommend using scanners that support Symbol Native API, or “SNAPI” mode. Scanners in SNAPI mode present themselves differently and we’ve programmed our POS to look for and handle this class of devices in unique ways. For example, you don’t need to click into a search box before scanning barcodes, and we can also receive information from drivers licenses.
We recommend using Symbol, Motorola, or Zebra brand scanners for the best experience.
Suggested Scanners:
- Wireless: Zebra DS2278 Cordless Barcode Scanner / Alternate Purchase Link (Newegg) / User Manual
- Wired: Zebra DS9208 Handheld 2D Barcode Scanner
- Wired: Motorola DS4208 Handheld 2D Barcode Scanner
- Wired: Symbol LS2208 Handheld 1D Barcode Scanner (note: does not scan QR codes or drivers licenses)
If you intend on using SNAPI mode on your scanners, you will need to configure them first. Out of the box, they come in keyboard-emulation mode, but you must configure them to be in SNAPI mode for best results. There are two ways to do this:
- Configuration barcodes. Click here to view these barcodes from your web browser and begin scanning them.
- It is very common for scanners to have trouble scanning computer screens. If you can print these barcodes, you may have better luck. Or just use the 123Scan utility.
- Zebra’s 123Scan Utility for Windows.
- Install and launch the app, then click the “Load configuration file” button and provide it with one of these files (depending on the model of your scanner):
- If you don’t see your scanner listed above, but you know that it does support SNAPI mode, you can use 123Scan and edit your scanner’s configuration and set its operation mode to SNAPI, then send the configuration to your scanner(s).
- Troubleshooting tip: if installation of the 123Scan utility fails with an error of “Specified Path Is Too Long”, follow these instructions and then run the installer again.
The 123Scan app is several hundred megabytes and can take quite a while to install and for it to download updates. To cut down on setup time, you can install 123Scan onto a single computer to do the initial setup of each scanner from that PC, and then move any scanners to other PCs afterwards. On all other PCs, you can simply install the “CoreScanner” driver software, which is a much smaller download.
Downloads:
- 123Scan Utility (includes CoreScanner driver)
- CoreScanner_Driver_(64bit)
- Scanner SDK for Windows – Software Downloads Page
Note: if using a wireless scanner and connecting with bluetooth (instead of the USB charging cradle/receiver), you will need to enable bluetooth pairing mode on your scanner and then connect to the device from Windows’ device settings menu as if it were any other bluetooth device. This usually involves scanning a special barcode that puts the scanner into bluetooth pairing mode. Instructions are available in the device’s manual.
Label Printer
Label Printers allow you to print product price tags (including barcodes) on adhesive stickers. You can also print custom stickers for labeling things around your store and re-use sticker designs across your stores. The Grindless POS has a label editor that lets you create templates for product price tags and other use cases. Label templates can then be shared across multiple stores as needed.
When printing labels, the Grindless POS supports two methods of printing:
- Dymo Web Service
- Windows (generic)
If your printer is a Dymo brand printer, then you can print to it directly without having to interact with Windows’ print window. Otherwise, when you go to print a label, you will see a pop-up appear and can press Enter on your keyboard or click Print in order to print your labels out.
As far as compatibility, so long as Windows can print to your label printer, Grindless can print to it as well.
Recommended Printers:
- DYMO LabelWriter 450 Turbo Thermal Label Printer
- Older model, does not have label DRM, cheaper but harder to find as time goes on.
- Cheap 3rd-party labels: HL-30334 6 Rolls; 1,000 Labels per Roll; DYMO-Compatible
- DYMO LabelWriter 550 Thermal Label Printer
- Newer model, does have label DRM. Only works with official DYMO labels (which are expensive).
- DYMO LabelWriter 550 model printers only work with genuine DYMO brand labels. These newer models have sensors in them which can detect if the labels you’re using were not made by Dymo. This means you cannot buy cheaper 3rd-party labels and will have to instead buy label rolls that are made by Dymo and are made for the 550 model specifically.
- Zebra ZD410
- Outstanding general use thermal label printer. Reliable, easy to setup and use, self-calibrating, compatible with cheaper label options.
- Note: No longer being made, replaced by the ZD411 model.
Caution: Avoid buying label printers that promote “cloud printing”. This includes certain Zebra models. These require a smartphone app to setup, which requires an account, and are generally annoying to setup and use. If something breaks, you’d need a username and password to figure it out, and these often get lost or the person who has them isn’t available.
Troubleshooting Tip: After installing Dymo’s software, reboot your PC. Our POS needs the webservice app to be running in user mode (not admin mode), and after installation is launches the webservice app in admin mode. Rebooting your PC (or just the webservice app) fixes this issue. After that, the WebService app (shown in your system tray, next to the clock) should be running in “User” mode, which is good. If you hover your mouse over the app icon, it should tell you which mode it’s running in. If it says “Admin” even after rebooting, then you should perform the following steps:
- From an Administrator account in Windows, open your Windows Search and type in “Manage Computer Certificates”.
- Expand Personal, click on Certificates.
- Right-click on Localhost (Make sure it’s the one issued by DYMO Root CA), All Tasks, and choose to Manage Private Keys.
- Click on ‘Add’, to add other user names or groups to access DYMO Connect Web Service.
- Click Apply, then Ok.
- Restart your computer and log in to the regular Windows user account.
Customer Display
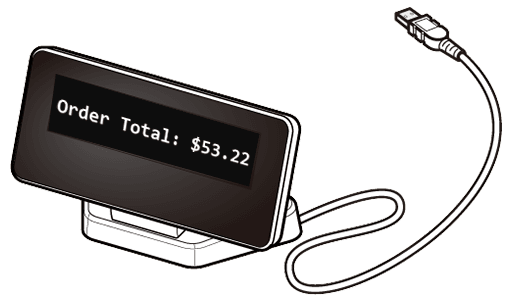 A small screen that is visible to the customer during checkout which provides information, such as the total balance due for the current order being transacted.
Supported device: HP LD220 USB. Download the Driver (must be version 3.4.22.214) and OPOS software packages. After installation, the settings panel in the Grindless POS application should use “opos:HP POS Pole Display” for the “Line Display LDN” option.
More devices may be compatible (contact us for details).