
Knowing what products you’re low on and submitting orders to vendors can be a time consuming process… if you’re not using the Grindless Point of Sale!
We have several complementary inventory features in place that help you stay on top of what you’re running low on and methods of gathering information and exporting lists that you can use for placing orders through yourself manually, or providing a list to your rep (that you can then upload back into the system too).
One very important point we want to emphasize about this topic is that it does take some amount of time and effort to set-up at first, but once you do, you’ll save time in the long run!
It’s not uncommon for us to find store owners who avoid doing this initial process for new products, but then find themselves in the awkward position of having to rush to place an order through their supplier and make judgement calls in the moment about how many they should buy to stock up. The goal is to identify problems before they happen, not after. The whole point of our software is to take the grind out of your daily routines and not taking advantage of our automations will inevitably lead to those frantic “oh no we ran out of stock” moments.
Let’s take a moment to go over how to streamline your inventory reorder process in the Grindless POS.
We’ll be covering these key points:
-
- Product Settings
- Suppliers: assigning a supplier to your products that you can use as a filter later on
- Reorder Level: Once your stock levels for a product reach this quantity, the system will consider that product “low” and put it on the reorder list
- Target Stock: When replenishing stock levels, this is the target quantity to aim for
- Reorder List
- How to use the Reorder List, including applying filters, logging orders, and exporting/importing spreadsheets for your supplier to reference
- Product Settings
Configuring Product Settings
Start by going to Settings > Manage Products and finding one or more products to configure. Select it (or a group of multiple products) and click the settings button (gear icon) in the actions bar.
Hint: use the search box in the upper right to filter the list of products down to the ones you want to manage.
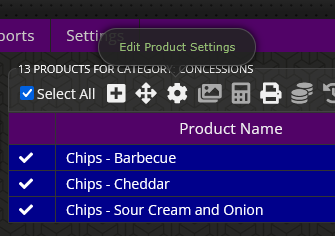
You’ll then be shown a pop-up where you can apply or change settings for your selected product(s).
With this box open, take a look at the “Location Settings” section. The fields we’ll be focusing on are Suppliers, Target Stock Quantity, and Reorder Level.
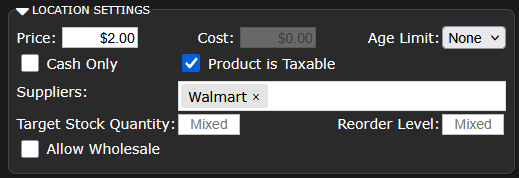
Make sure a supplier is set for your product(s). This lets you to filter your Reorder List to products sold by that supplier so that when you go to place an order through them, you can see all products you’re low on in one simple list. If there are multiple suppliers that offer this same product, you can add additional suppliers as well as a backup in case your primary one is temporarily out of stock.
In addition to the Suppliers option, you’ll also find Target Stock Quantity and Reorder Level.
Reorder Level is your “minimum” and Target Stock Quantity is your “maximum”. When the system detects that the current stock level for a product falls below your Reorder Level, it will consider that product as being “low” and will include it on your Reorder List. Once it is on the list, the POS will calculate how many of that product you should order from your supplier by looking at how many you currently have in stock and what your Target Stock Quantity is.
Using The Reorder List
The Reorder List shows any and all products that your store is low on and can be found by going to Tasks > Reorder List.
In the example below, we’ve filtered the list down to all products that we’re low on from one specific supplier (Walmart in this case).

At this point, we would login to our supplier’s website, find each item by searching for its name or SKU, and add however we need to our current invoice.
For example, in the screenshot above, the product “Chip – Barbecue” currently has 2 in stock and our Target Stock Quantity is 12, so the system calculates that we should order 10 from our supplier (Walmart). Go through each item, find it on your supplier’s website, then click the number shown for it under the Needed column to tell the system how many you have ordered. We can also tell the system how much we paid for each item too so that it can factor that into reports that use cost-of-goods.
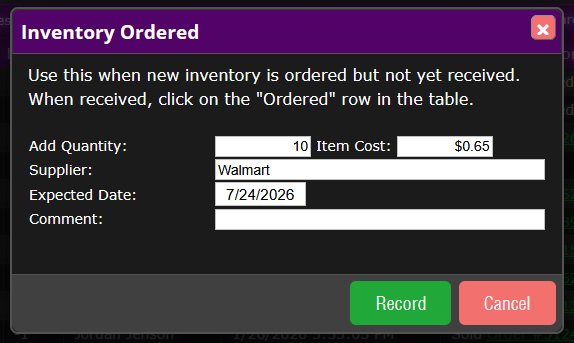
Hints for using the Reorder List:
- Want to order items that you aren’t low on yet? Click the “Show All” checkbox to include products that you’re stocked up on so that you can order more.
- If you don’t know your per-item cost and only know the total cost, you can open a calculator pop-up by pressing math operators on your keyboard to calculate its per-item cost.
- For example, if you paid 10 dollars for 2 items, you would type “10.00” then the divide button on your keyboard (slash), then 2, then Enter and the system will calculate that $5.00 is your cost per item.
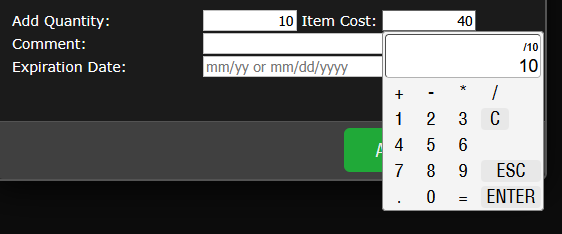
- For example, if you paid 10 dollars for 2 items, you would type “10.00” then the divide button on your keyboard (slash), then 2, then Enter and the system will calculate that $5.00 is your cost per item.
- If, while you’re carrying out your reorder, you notice that your min and max levels need to be adjusted, you can click on the product’s SKU to open its settings and change min/max targets as needed. If you want to stop carrying a product you’re low on, set its Target to 0.
- You can use the Apply Formula feature to automatically set all products in a given category to being Inactive if they are out of stock and their Target stock is set to 0. This helps avoid outdated products you no longer carry from being included in the list.
After you’ve placed your order through your supplier, you’re all set! The system now knows that those products are on their way. Your current stock levels will remain unaffected until the shipment comes and the items in it are marked as received.
Receiving Shipments
Once the shipment arrives to your store, open the box and begin receiving the shipment by going to Tasks > Shipment Received. From there, find the shipment in the list and click on it to open up that shipment.

Take each item out and scan its UPC barcode with your scanner one by one. As you scan, the system will increment the amount received for that product (scan multiple times to increment the number multiple times).

Once you get through the entire box, take a look at the shipment and double-check that all items are accounted for and that you’re not missing anything, then click Record Received Items. The shipment will now be marked as completed and any items in it will have their stock levels updated as expected.
Reordering Via Spreadsheets
The normal workflow is to open the Reorder List and use that as a reference while you’re populating an invoice to your supplier for products they sell. Aside from going through each product in the POS, you can alternatively download a spreadsheet of all of the items you are low on by clicking the Download button at the top of the list. If you have a sales rep that you interact with at your supplier, you can send them this spreadsheet and have them prepare your invoice for you, going line by line and populating it with how many are to be included in the shipment.

Once they fill out your spreadsheet and send it back to you, use the Upload button on the Reorder List to automatically populate the quantity ordered for each product given. If you’re buying any new products from your supplier, you can include them in the sheet to have the system create new products and set their “On Order” level too.
Hint: When importing a spreadsheet, you can use the product’s SKU in the ProductID column and the POS will attempt to find a match based on the SKU given. This is useful for instances where your supplier sends you a spreadsheet without them receiving one to edit from the POS first.
Of course, you can also simply use this spreadsheet yourself if you’d prefer to work in an external spreadsheet app (Excel, Google Sheets, etc) instead of the POS. This can come in handy, for example, if you want to calculate a Target Stock Quantity based on how many of that product you’ve sold in the past 90-days. In that case, you’d go to Reports > Sales Report, export that report as a spreadsheet, and cross-reference each product on your Reorder List by matching Product IDs.
Conclusion
Using the Reorder List is entirely optional, and we don’t force our users to use it, but you will find that once you understand how to use it and implement it into your routines, you will find that it can be quite the time saver, which lets you stop focusing so much on the monotonous tasks and instead put the time you saved into more important things your store needs.
Have any questions about inventory, bulk product management, or reorders? Check out our in-depth guides found within the POS itself by clicking the Help icon in the navigation bar. Need even more help? Send us an email at support@grindless.com, or use the “Get Support” button in the POS to open a support ticket with our staff.