
If you operate more than one retail location in Grindless, Store Transfers make it easier to move inventory between your stores while keeping quantities and product records organized!
We’ve also recently improved the Store Transfer process, so this is a great time to take another look at how the feature works and some of the details you may not be familiar with.
Using System Customers
The best method for transferring inventory between stores is to use special “System Customers”, which represent another store within your company. These accounts appear alongside your regular customers, while allowing Grindless to recognize them as being a transfer destination (where inventory is being sent to). You basically start a normal sale under one of these System Customers, and the Sale screen will have a special way of handling your order as a transfer. Read on to learn more!
To create System Customers:
- Go to Settings > Manage Organizations and click Edit next to the store that will be sending inventory.
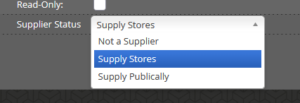
- Turn on Supply Stores for that location under “Supplier Status”.
- At the receiving store, go to Settings > Suppliers > System Suppliers and select Add New.
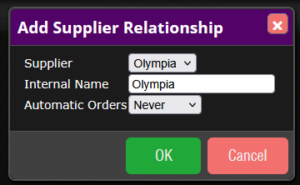
- Add the sending store. Repeat the process for each store that will be sending and receiving.
- Switch back to the sending store. A new System Customer should now appear in the customer list.
- Edit that customer and rename it, if needed, so the transfer direction is clear.
After the appropriate store relationship has been configured, a System Customer will be created at the sending location. We recommend renaming these accounts so your staff can immediately tell which transfer they are intended for. For example, if the store you’re at is named “Downtown” and you regularly sends products to your “North Bend” store, it may be wise to rename the system customer for North Bend to something recognizable, such as “North Bend to Downtown Transfer”, or something similar. Clear naming makes it much easier for staff to select the correct destination when starting a transfer.
Making a Store Transfer
Once your System Customers are set up, carrying out a transfer is a relatively simple process:
- Start a sale at the store that is sending products and select the System Customer for the store that is receiving them.
- Add the products and quantities you want to transfer to the order.
- Open the order options (the 3-horizontal lines icon near the top) and select Make Transfer. Grindless automatically changes each product’s price to become its cost.
- When the order is ready, complete it using the payment method you’ve set aside for transfers (such as “Store Transfer”). No money changes hands; this simply allows the order to be processed and completed.
- After the products arrive, the receiving store opens Tasks > Shipment Received and receives the shipment just like one arriving from another vendor.
That’s it! Grindless handles the inventory movement and product sharing associated with the transfer behind the scenes.
For complete instructions and explanations of each option, you can find additional help directly within Grindless using the Help content available in the POS.
Recording Payment for Transfers
A Store Transfer still needs to be marked as paid to be completed, but no money changes hands between your stores. Instead, the order is completed using a payment method used only for transfers, typically named something like Store Transfer. This keeps transfers separate from your actual sales.
The price used during the transfer also serves an important purpose: it becomes the product cost at the receiving store. Because of this, when an order is made into a transfer, Grindless automatically changes each product’s price to its cost. There’s no need to discount anything yourself. This allows the receiving location to bring the inventory into its system with the appropriate cost information already attached.
What Happens When a Product Isn’t at the Other Store?
The product does not need to already exist at both locations before you transfer it. For example, if Store A transfers a product to Store B and Store B does not currently have that product, Grindless will share the product with Store B as part of the process. Inventory is then deducted from the sending store and received at the destination.
With product sharing, the primary product record remains with the store where it was originally created. The other location receives access to that shared record rather than maintaining an entirely separate copy. This helps businesses maintain consistent product information across locations while still allowing certain settings to be managed independently for each store.
Many product fields are shared globally, so changes made to those fields can automatically be reflected at the other location. Other settings can remain specific to an individual store. When editing a category or product, these store-specific options can be found within the Location Settings section when viewing the settings for a shared product.
An Easier Way to Move Inventory Between Stores
Store Transfers are designed to make moving inventory between your locations feel much like the other workflows your staff already uses in Grindless: build an order, mark it as a transfer, complete the transaction, and receive the shipment at its destination.
If your business operates multiple Grindless locations but hasn’t been using Store Transfers, now is a good time to become familiar with the feature. Check the Help content within the POS for additional instructions on setup and completing your first transfer.